
DIY: Calm Down Jars
Jude and Caroline go to a Mother's Day Out program on Tuesdays and Thursdays, so yesterday morning, after I dropped them off, I found myself parked in front of a big box craft store.
@indianaadams That sounds like you went looking for trouble. ;)
— Greta Egger (@Gretagroupie) August 19, 2014I have a 40% off coupon and a DIY themed Pinterest board and a kid-free afternoon. NOTHING WILL STOP ME FROM CRAFTING. Except maybe a nap.
— Indiana Adams (@indianaadams) August 19, 2014It's been a zoo here, people. The last couple of days, after the kids got up from their (too short) naps, I've had to take a peek in my cabinet to see if the elder two have found my secret stash of chocolate covered espresso beans because surely that's the only logical explanation to how crazy go-nuts bananas they've been, energy-wise. The bag has remained untouched, but my kids? BOUNCINGOFFTHEWALLS!
So while scrolling through my pins in the Crafty McCraftersons parking lot, I saw it: a calm down jar. Seemed easy and cheap enough and whoa! Could it be my sanity saver?

The idea is this: Fill a jar with glitter and glue, shake it up (as opposed to Shake it Off, I guess), and have the rambunctious offenders sit quietly in a chair and hold the glitter jars until said glitter has settled at the bottom. Ooooooh, pretty...
Better yet? Some of y'all may have everything you need at home this very moment and can make this without going inside the always overwhelming craft store!

I recommend doing this over newspaper. I learned this the hard way.

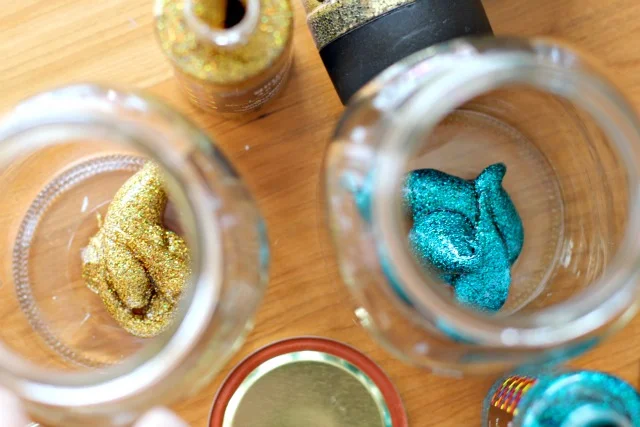
Big glitter, little glitter. You need both. I know, I know. It's an extravagance that's worth it, allegedly!
NEEDS:
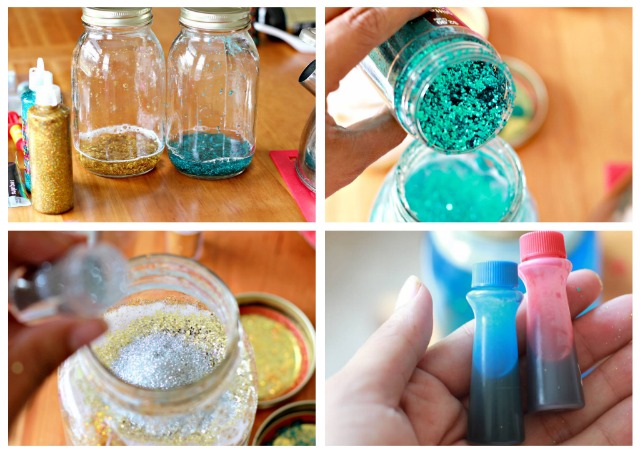
+ Containers with tight fitting lids (I used mason jars because, well, Pinterest).
+ Glitter glue
+ Warm water
+ Chunky glitter
+ Fine glitter (bet you didn't know glitter had different grades, did you?)
+ Glass adhesive or super glue to seal the lid (IMPORTANT!)
+ Optional: garment grade sequins (so they color won't wear off in the liquid), food coloring
INSTRUCTIONS:
Please note, I'm a winging it kind of gal and this is a winging it kind of craft, so beware of that fact up front, mmmmkay?
STEP ONE:
Squirt glitter glue into the bottom of the containers. I used glass jars because I'm an optimist. I now recommend plastic. (More on that later). The glitter glue is what thickens the water, making the loose glitter float for a bit before settling too soon. Choose your glue amount wisely:
How much glitter glue did I use, you ask? Imagine a miniature dachshund's morning poop. That much.
STEP TWO:
Pour warm water over the glitter glue and swirl, swirl, swirl around until the chunks have dissolved. Top the jar off with cool water, about 3/4's the way full.
STEP THREE:
Add about an inch of chunky glitter to the bottom of each jar.
Lalala. Winging it. It's easier to do this part without kids, but if you're a doting / loving mom, you'll let them be involved in this part, too.
STEP FOUR:
Add at least two tablespoons of fine grade glitter.
OPTIONAL STEP FIVE:
Add a few drops of food grade coloring to each jar and maybe a dash of sequins or confetti.
STEP SIX:
Put the lids on tight and give the jars a good shake to see if you need more food coloring or more sparkles or more glitter glue if the loose glitter is falling too fast. Adjust accordingly.
STEP SEVEN:
This is hard, but remove the lids and put the jars on a table and let all the glitter settle to the bottom. This could be 20 minutes or so, depending on how much glue you used in step one. Keep your kids away from the jars at this time. And maybe your curious cat, too.
STEP EIGHT:
Gently fill the jars with more water, filling them almost all the way to the top, to at least the first threads. If there is any foam in the jar at all, carefully scoop it out with a spoon, even if the foam is carrying a lot of fine glitter with it. Gently top off with more water if needed.
NOT AT ALL OPTIONAL STEP NINE:
Glue the lid on and let the epoxy cure for however long the instructions say (and then some just to be safe!).

Don't be a fool and skip this part. Trust me on this. Caroline immediately brought me her jar and said, "Drink? Open? Please?" after trying with all her might to get the lid off. Foresight, people! FORESIGHT!
STEP TEN:
After you are certain the glue has dried, give your kids the jars. Watch their little faces as the glitter swirls 'round and 'round. Take a big breath. Shake the tension out of your neck and shoulders. Love the little years and yadda yadda... all that other good motherly advice.

Ta-da! Glitter + glue + glass = a mother's dream come true... or her worse nightmare...

OVERALL:
Project ease: A- (the minus because glitter is a pain to clean up)
Cost: So cheap! And I have enough glitter left over to make 100 more calm down jars.
Regrets: Lots. More to come...